Why the corners matter
Every straight run of fence hangs off its corner posts. If a corner is out of square or a post leans, the error carries down the whole line: panels won't fit, gates bind, and the fence looks crooked from the street. Getting the corners right is most of the job.
This is the method our crew uses on wood fences. The drawings in this guide are illustrative, not photos of a specific job.
Before any digging
- Confirm the fence line from survey pins or the owner's plan.
- Check permit, HOA, and setback rules before you set anything.
- Have utilities located. Call 811 and wait for the marks.
- Post size, depth, spacing, and concrete follow the job spec or local code (including frost depth), not this guide.
Step 1: Mark the corners and run strings
Pick one convention for the whole job: the string marks the outside face of the fence line. The post's face sits against the string, so the point where two strings cross at a corner is the post's outside corner.
Set stakes back from the corner. Drive a stake 1 to 2 ft past each corner on each fence line, so the stakes stay clear of the holes. Each string also needs a stake at its far end, such as the next corner or the end of the run. Batter boards (two stakes and a crosspiece) are an option; they make strings easy to adjust.
Pull the strings tight and at the same height. Don't move the stakes while digging. If you drop a string to dig, re-hang it exactly as before.
Mark each hole center half a post width in from each string.
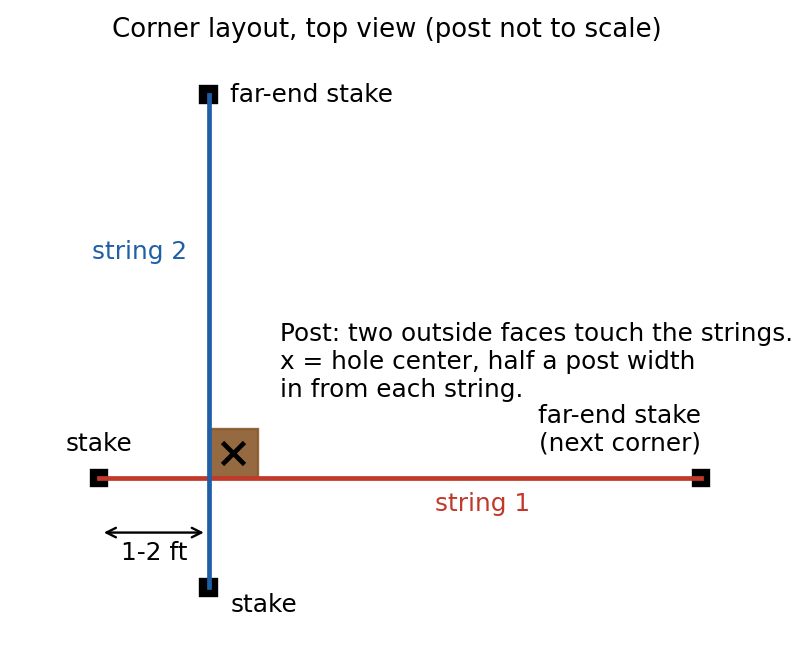
Illustrative drawing, not a job layout: strings mark the outside face of the fence, and the hole center sits half a post width in from each string.
Step 2: Square the corner with 6-8-10
This is the 3-4-5 rule, doubled. A triangle with sides of 3, 4, and 5 always has a perfect 90-degree corner, and so does one with sides of 6, 8, and 10.
Measure out both strings. From the string crossing, measure 6 ft along one string and mark it. Measure 8 ft along the other string and mark it.
Measure between the marks. It must read exactly 10 ft.
Adjust until it does. If it reads long, the angle is too wide. If it reads short, it's too tight. Swing the end of one string sideways and re-measure until it reads 10 ft.
Go bigger when you can. Longer legs are more accurate: 9-12-15 or 12-16-20 ft work the same way. Keep the tape level and the strings tight.
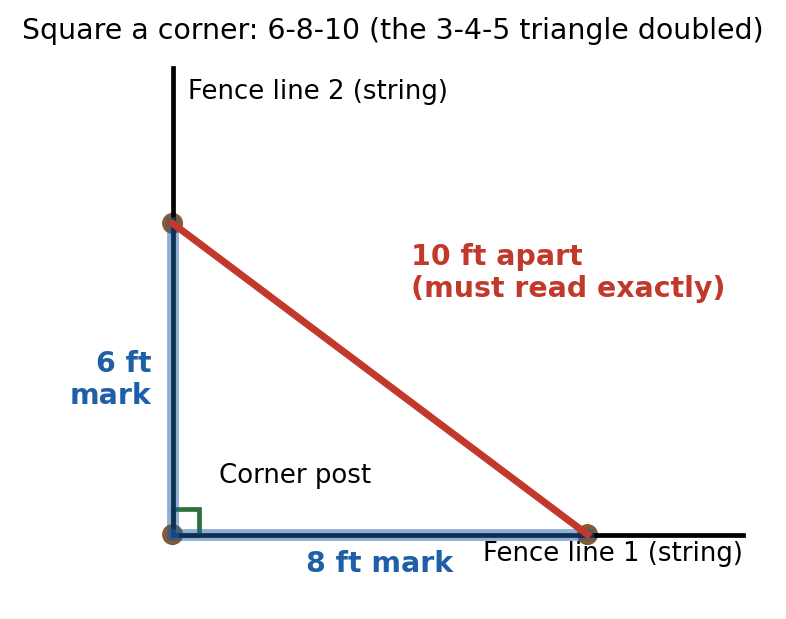
Illustrative drawing: 6 ft on one line, 8 ft on the other, and exactly 10 ft between the marks.
Step 3: Check the whole layout
Measure opposite sides. When all four corners are strung, measure both pairs of opposite sides. They must match (AB = DC, AD = BC).
Measure both diagonals (A to C and D to B). They must match too. Equal diagonals alone don't prove a rectangle; you need equal opposite sides and equal diagonals together.
If something is off, re-check the 3-4-5 triangle at each corner and adjust.
This only applies to a rectangular layout. If the fence line follows an irregular property line, follow the plan or survey for those corners.
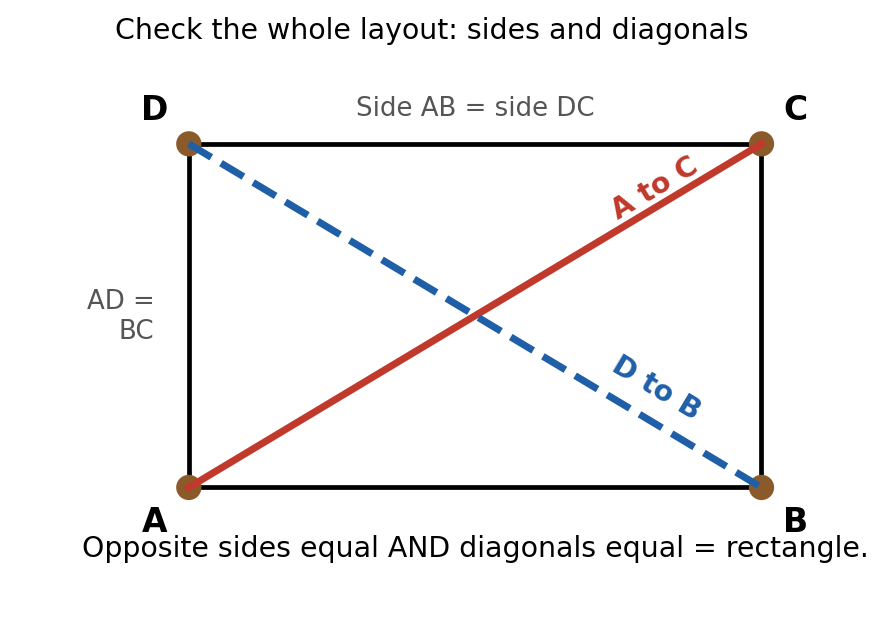
Illustrative drawing: opposite sides equal and diagonals equal means the layout is a true rectangle.
Step 4: Dig and set the corner posts
Dig at the marked hole center (half a post width in from each string) to the spec depth. Quikrete's guidance: a hole about 3 times the post width; depth about 1/3 of the post length plus 6 in of gravel, and below the frost line where the post carries structural load. The job spec or local code overrides.
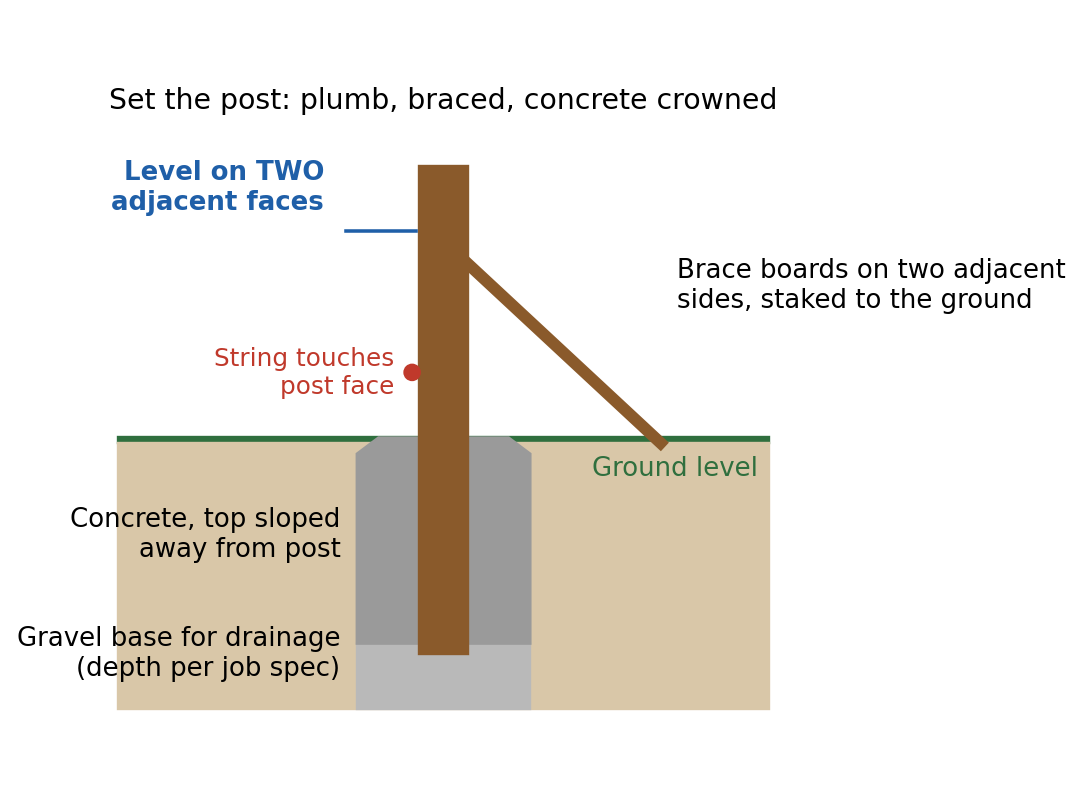
Set the post against the strings. Tamp the bottom, add the gravel base, then set the post in the center of the hole with each outside face against its string: just touching, not pushing it (Hoover Fence leaves about 1/8 in of clearance).
Plumb and brace it. Check plumb with a level on two adjacent faces. Brace it with boards on two adjacent sides, staked to the ground, so it stays plumb while the concrete sets.
Pour the concrete. Slope the top of the concrete so water runs away from the post, then re-check plumb and string alignment before it sets.
Leave the braces on until the concrete has set (This Old House says at least 24 hours before continuing fence work). Follow the concrete product label for water mix and wait times.
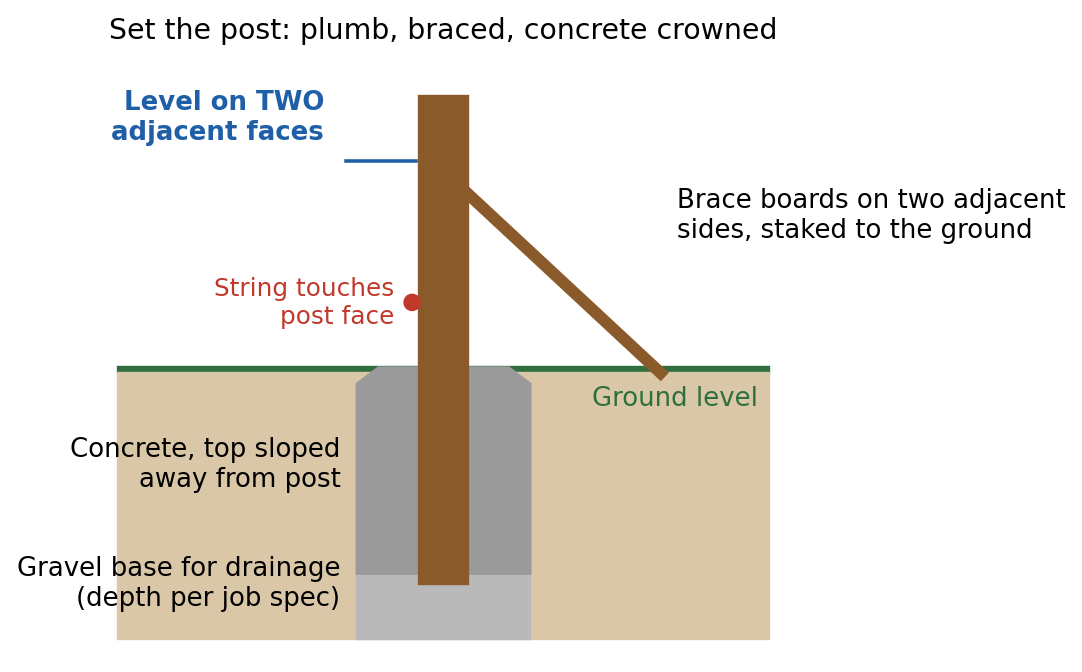
Illustrative drawing: gravel base, concrete sloped away from the post, plumb on two faces, braced on two adjacent sides.
Step 5: Set the line posts
Run a string between the finished corner posts, then mark and set line posts at the spec spacing, aligned to the string.
Divide each run evenly. Sections = run length ÷ max spacing, rounded up. Actual spacing = run length ÷ sections. For example, a 50 ft run with an 8 ft max spacing needs 7 sections (6.25, rounded up), so the posts land about 7 ft 2 in apart.
Re-measure after each post. Fix errors before the concrete sets, not after.
Quick checklist
- Lines located (811)
- Strings tight, stakes clear of the holes
- Corner check reads exactly 10 ft (or your larger triangle)
- Opposite sides and diagonals equal
- Posts plumb on two faces
- Posts braced
- Concrete crowned so water runs off
Common mistakes we see
- Measuring along the ground on a slope instead of holding the tape level.
- Bumping a stake while digging, then setting posts to a string that moved.
- Trusting equal diagonals alone. A shape can have equal diagonals and still not be a rectangle; check the sides too.
- Pushing the string with the post, which bends the line you're setting everything else to.
- Pulling braces early or hanging rails before the concrete has set.
- Leaving the concrete flat or dished so water sits against the post and rots it.
When to call a pro
Bring someone in if the fence follows an irregular property line, you're not sure where the line actually is, the ground is rocky or steep, or the fence has to meet permit, HOA, or pool-barrier rules. We set fence posts as part of exterior repairs and rental turns, and we can handle the layout and corners even if you want to hang the panels yourself.
Sources
- Hoover Fence chain link installation manual (3-4-5 method; stakes 1 to 2 ft from corners; post set 1/8 to 1/4 in from string)
- Lowe's: Making and using batter boards (three-four-five check)
- Smart Fencing Calculator: Fence layout measuring guide (6-8-10, horizontal tape on slopes, even spacing, 811, survey pins)
- Quikrete: Setting posts (hole 3x post width, depth 1/3 post length plus 6 in gravel, below frost line when structural)
- This Old House: Fence post installation (string touches post face, braces on adjacent sides, slope concrete away, 24 hr set)
- Yardpour: Set fence posts in concrete (two boards on adjacent sides, crown concrete)
- NC811 safe digging guide
The rectangle check (equal opposite sides plus equal diagonals) is basic geometry. Diagrams are illustrative drawings, not a specific job layout.